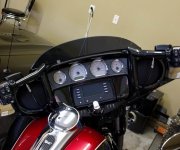
Factory 47 Assault Bars..

It's not the step at the riser.. it's the 1.5" after that before it bends up... you'll see... all clearancing cannot be seen when assembled, so don't sweat it... it's easy to do and again... unseen

Sent from Note4 via TapaTalk

Well if it requires me to clearance the inner fairing I'll send them back as I'm not will to modify it even if it's unseen. Speaking to the guys at Factory 47 they made it clear that no clearancing would be required, so it looks like I'll have to wait and see.
 
Well if it requires me to clearance the inner fairing I'll send them back as I'm not will to modify it even if it's unseen. Speaking to the guys at Factory 47 they made it clear that no clearancing would be required, so it looks like I'll have to wait and see.
Well.. you'll just have to wait and see. I would suggest you install them bare ( before you run internal wiring) to ensure they fit without clearancing to be on the safe side

Sent from Note4 via TapaTalk
 
Well.. you'll just have to wait and see. I would suggest you install them bare ( before you run internal wiring) to ensure they fit without clearancing to be on the safe side

Sent from Note4 via TapaTalk

Just got off the phone with them and they explained a little more why there is no modifications to the fairing needed. The bar is actually a 3 step bar, it goes from 1" at the clamp area, to 1 1/4" at the bend and as soon as it clears the fairing it steps to 1.5" He said you can't even see the 1 1/4" area since it's right at the bend of the bar and it sits up close to the fairing. Either way, I'll still install them bare to verify clearances.
 
Just got off the phone with them and they explained a little more why there is no modifications to the fairing needed. The bar is actually a 3 step bar, it goes from 1" at the clamp area, to 1 1/4" at the bend and as soon as it clears the fairing it steps to 1.5" He said you can't even see the 1 1/4" area since it's right at the bend of the bar and it sits up close to the fairing. Either way, I'll still install them bare to verify clearances.
Now that makes sense.... the Torch bars were stepped from 1" to 1.5" ... you should be good...

Sent from Note4 via TapaTalk
 
5b2be92e814b7fcc18558c1fa8c2db46.jpg
cfb32c44f95a3d60dc6ae0014d08e8c3.jpg

I chose these because they are wide. Put a set of Yaffe bars on a roadglide last week, they are nice but I am 6' 2" and they felt narrow.
 
Thank you brick, bike looks good with them bars. If you don't mind taking one more picture from the back of the bike looking forwards. Just trying to get a good reference for how wide these bars are.
 
35191c9c37c0adf14ca5c9ec96128c91.jpg
d88903a3cff68b10c84cd9776983e4b9.jpg

It that what your after? Hope it helps. You won't regret the decision. They are quality, easy to pull wires and the fit is perfect.
 
Those bars look perfect. Glad I chose the 12", mine will be black though. From the back the bars look like they are super wide, but from the front not so much. I wanted these bars because of the width (39") compared to the Yaffe or Vindikta bars are 35-36"
 
Last edited:
Just finished installing mine, took about 4 hours and the fit and finish was perfect. No trimming of the fairing or alterations to the bike required. I used the NAMZ plug and play switch housing harnesses (not the extensions) and the factory FBW harness was plenty long enough. The brake and clutch hydraulic lines were just barely long enough to work with these bars (12"), I'll probably swap the hydraulic lines out this winter to ones that are about +4-6" length to give me more options down the road.

Factory 47 12" Assault bars.jpg
 
Yes, I'm going with the 12" also .....

They look great too .....

Helo ..... It states on their website for the 12" bars .... "Need cables extended +4 and Need control wire kit #1005 and throttle by wire kit #1006" ....

Did you order these also?
 
Yes, I'm going with the 12" also .....

They look great too .....

Helo ..... It states on their website for the 12" bars .... "Need cables extended +4 and Need control wire kit #1005 and throttle by wire kit #1006" ....

Did you order these also?

No need to extend the cables if you don't want to buy them as there is enough slack after re-routing the lines a little, but I'll probably do the cables this winter as a project just to give a little more slack. They aren't tight or anything, but you have to run them just right to make them work (the brake side specifically). As for the wiring, I bought the NAMZ plug and play switch harnesses: https://www.namzcustomcycleproducts.com/products/2014_up_fl_switch_harness.html

On 2016 bikes there's no need for the throttle by wire extension either, plenty of slack. No need to de-pin that connector to run it in the bars either, it has the smaller plug compared to the 14-15 bikes.

Great ..... thanks so much for the info ......
 
How hard is the install on these, i'm pretty much a novice when it comes to wrenching on a bike. I can start it, tune the radio and fill it with gas. After that i'm pretty much all thumbs.
 
How hard is the install on these, i'm pretty much a novice when it comes to wrenching on a bike. I can start it, tune the radio and fill it with gas. After that i'm pretty much all thumbs.

If you buy the wiring extensions or the plug and play harnesses I linked above and have some basic hand tools (Torx bits, hex bits and a supply of sockets and ratchets) it's really not all that difficult. There are plenty of how to videos out there that can help you if you have no clue how to even start. I'd suggest a service manual as well. The most "difficult" part was fishing the wires through the bars, but even that's not really that difficult, just need to take your time and have some patience with it.

I removed my gas tank and front fender to reduce the risk of damaging the paint on them. I didn't remove the entire fairing though, just the outer cover and then tilted it forward to give me access to the riser clamp.
 
No need to extend the cables if you don't want to buy them as there is enough slack after re-routing the lines a little, but I'll probably do the cables this winter as a project just to give a little more slack. They aren't tight or anything, but you have to run them just right to make them work (the brake side specifically). As for the wiring, I bought the NAMZ plug and play switch harnesses: https://www.namzcustomcycleproducts.com/products/2014_up_fl_switch_harness.html

On 2016 bikes there's no need for the throttle by wire extension either, plenty of slack. No need to de-pin that connector to run it in the bars either, it has the smaller plug compared to the 14-15 bikes.
It looks like NAMZ made some changes. Any chance you could post an updated link?

Sent from my SM-G935P using Tapatalk


Latest posts

Forum statistics

Threads
7,978
Messages
69,245
Members
15,071
Latest member
Mikes469