120 to 114 to 113 Twin Cam Engine Rebuild
- Thread starter hulkss
- Start date
You are using an out of date browser. It may not display this or other websites correctly.
You should upgrade or use an alternative browser.
You should upgrade or use an alternative browser.
Opened up the cam chest tonight and pulled out the lifters, chain drive, cams, cam plate, and oil pump. Everything looked good.
I installed a crank run-out inspection fixture #785 from Jims. Crank run-out in the cases measured .0011 Total Indicated Run-out (TIR). This is very good! Harley has the limit set at .0120 which sounds horrible to me. This is a perfect slightly used crank set for some one who wants to build a 4 5/8" stroke motor.
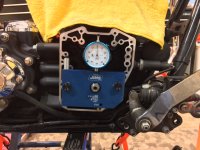
I installed a crank run-out inspection fixture #785 from Jims. Crank run-out in the cases measured .0011 Total Indicated Run-out (TIR). This is very good! Harley has the limit set at .0120 which sounds horrible to me. This is a perfect slightly used crank set for some one who wants to build a 4 5/8" stroke motor.

Engine is OUT!
Engine is OUT!
A major milestone today. The engine is out of the bike.
All that remained to be pulled out was the crankcase with one component inside - p/n 23893-10A flywheel assembly.
One person can do it this way as it's small, not too heavy, and there is plenty of clearance to reach around and lift by the cases. The engine is now in the H-D engine stand p/n 94845-10.
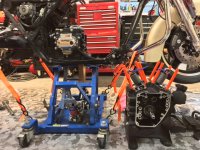
Here's my first deviation from the Factory Service Manual (FSM) instructions. You do not need to remove the front engine mount. Just pull the two front bolts that hold the engine to the front mount. If you look close at the picture below, you'll see a scissor jack with a piece of wood on it holding up the transmission (per FSM). Use it to lift the transmission just a bit and unload the front mount. Then remove the 4 bolts to the transmission housing. Now lift...you need to tip up the front a bit and move forward off the transmission locating dowels.
I put some tie wraps through the rod ends to keep them from flopping around and damaging the case bores. That's the 5.5 quart SE oil pan under the transmission.
Next step - split open the case halves. Time to read some more instructions.
Engine is OUT!
A major milestone today. The engine is out of the bike.
All that remained to be pulled out was the crankcase with one component inside - p/n 23893-10A flywheel assembly.
One person can do it this way as it's small, not too heavy, and there is plenty of clearance to reach around and lift by the cases. The engine is now in the H-D engine stand p/n 94845-10.
Here's my first deviation from the Factory Service Manual (FSM) instructions. You do not need to remove the front engine mount. Just pull the two front bolts that hold the engine to the front mount. If you look close at the picture below, you'll see a scissor jack with a piece of wood on it holding up the transmission (per FSM). Use it to lift the transmission just a bit and unload the front mount. Then remove the 4 bolts to the transmission housing. Now lift...you need to tip up the front a bit and move forward off the transmission locating dowels.
I put some tie wraps through the rod ends to keep them from flopping around and damaging the case bores. That's the 5.5 quart SE oil pan under the transmission.

Next step - split open the case halves. Time to read some more instructions.
Now for some "weird science". I'm sending my new pistons to Line2Line Coatings for Abradable Powder Coating (APC). This coating will replace the ineffective black factory coating on the pistons that does not do much other than change the color. APC allows for the best possible piston fit in the cylinder, extending engine life and reducing noise and vibration caused by piston slap. Check it out here: Line2Line
View attachment 11991
Here's their patent if interested: APC patent
Hulk how much piston clearance are you going to allow. My machinist is recommends .0025 to .003 but for my turbo setup .005 to allow for the extra heat expansion on the forged piston.
Hulk how much piston clearance are you going to allow. My machinist is recommends .0025 to .003 but for my turbo setup .005 to allow for the extra heat expansion on the forged piston.
The factory recommended clearance fit for the 22575-07B pistons I'm using is 0.002. The Line2Line abradable coating will fill that space and wear into the required fit and shape based on operating conditions.
High power is more heat and pressure so you need more piston clearance with a turbo-charger.
Still taking things apart here. Got the engine cases split. Glad I set them upside-down in an oil pan first. There was over a cup of oil in there.
I removed the fasteners holding the cases together. I was trying to pull out the sprocket shaft seal and the cases moved partially apart while sitting upright in the H-D engine stand. No way was that seal coming out easy. The little H-D engine stand really comes in handy. I just carefully lifted the unbolted cases out of the stand and set the cases on a couple 4 X 6 wood blocks with the sprocket shaft side down. The cam side case just lifted off. Then the flywheel assembly lifted out of the left case half. I pulled the thrust washer out through the sprocket shaft oil seal and then I could drive out the seal from the inside. All I have remaining to disassemble is to press out the main bearings & cam bearings. I'll take the piston oil jets out also to make sure they are not plugged. Then I'll wash everything clean in a plastic tub with mineral spirits.
Here you can see the I-beam rods. The replacement crank will have heavy duty connecting rods.
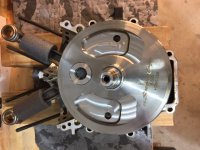
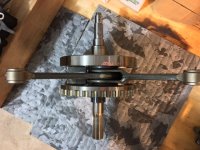
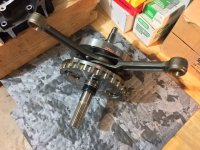


Short life is somewhat inherent in the design of the 120" motors. They were originally built for racing, not touring. That's why I'm dropping it back to 114" with reduced stroke and longer connecting rods. Same bore & stroke as the new M8 114 kits. I explain my view of those issues in post 14 of this thread. Bigger is not always better.
There are also some valve train issues that I am addressing as discussed in post 6. I'll be putting in upgraded valve lifters too. I'll show all the new parts as the engine goes back together. I'm hoping for much improved engine life and the same or better performance.
There are also some valve train issues that I am addressing as discussed in post 6. I'll be putting in upgraded valve lifters too. I'll show all the new parts as the engine goes back together. I'm hoping for much improved engine life and the same or better performance.
Thanks guys. So far I don't think I've wrecked any parts that are supposed to be re-used. The cylinders and pistons are on the return trip from service and the heads should be worked this week. I've got my valve train parts back from Dicronite.
I hope this build will go 100,000 miles. Wishful thinking I know.
I'm learning as I go here, but I do read a lot.
I hope this build will go 100,000 miles. Wishful thinking I know.
I'm learning as I go here, but I do read a lot.
Engine disassembly complete
Engine disassembly complete
Finally, the engine is completely apart. The bearings came out with no problems using the H-D crankcase bearing tool p/n 14900014. My Chinese affordable press from Northern Tool worked like it should. Don't buy a smaller one, they're too flexible.
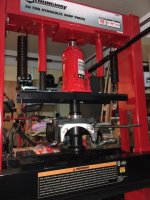
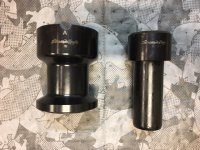
The cam bearings came out easy with George's inner cam bearing puller #320640.
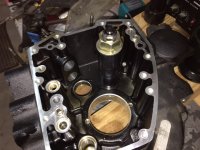
Here's a pic of a tiny piston cooling/lubricating oil jet orifice. If that is plugged, your engine won't last long. I took 'em out to clean the cases with mineral spirits. Make sure they are open.
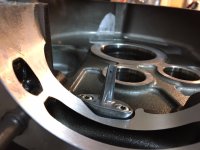
Now to clean the cases, clean-up the bike frame, and begin reassembly.
Engine disassembly complete
Finally, the engine is completely apart. The bearings came out with no problems using the H-D crankcase bearing tool p/n 14900014. My Chinese affordable press from Northern Tool worked like it should. Don't buy a smaller one, they're too flexible.


The cam bearings came out easy with George's inner cam bearing puller #320640.

Here's a pic of a tiny piston cooling/lubricating oil jet orifice. If that is plugged, your engine won't last long. I took 'em out to clean the cases with mineral spirits. Make sure they are open.

Now to clean the cases, clean-up the bike frame, and begin reassembly.
Assembly Begins
Assembly Begins
After cleaning the engine cases, I pressed the main bearings and cam bearings into place. The main bearings use the same tool as before. The cam bearings have an installer tool that fastens to the right case half.
I un-boxed the new 4 3/8 stroke crank shaft. The rods are quite a bit beefier on the big end on the new set.
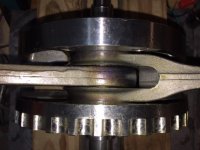
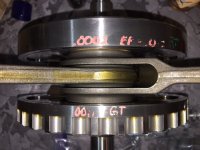
I set the left case half over the sprocket shaft side. Then I flipped both pieces over to be ready to drop on the right case half. At this point it's time for sealant to be applied the the mating surface on the right half (it has the dowel pins in it).
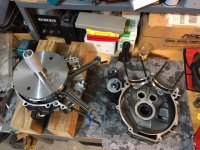
It was a bitch trying to squeeze out a tiny bead of sealant about .050" in diameter. I made the hole in the nozzle a little bigger. Well.....this ain't like caulking in a bath tub. When I put the case halves together I had way too much sealant squeeze out. I lifted the right case half off, cleaned up the mess, and will try again tomorrow. Note the rods tie wrapped so they don't flop around and the guide on the flywheel shaft that spreads the bearing rollers so the right case half will drop on and not hang up on the inner bearing race.
Assembly Begins
After cleaning the engine cases, I pressed the main bearings and cam bearings into place. The main bearings use the same tool as before. The cam bearings have an installer tool that fastens to the right case half.
I un-boxed the new 4 3/8 stroke crank shaft. The rods are quite a bit beefier on the big end on the new set.


I set the left case half over the sprocket shaft side. Then I flipped both pieces over to be ready to drop on the right case half. At this point it's time for sealant to be applied the the mating surface on the right half (it has the dowel pins in it).

It was a bitch trying to squeeze out a tiny bead of sealant about .050" in diameter. I made the hole in the nozzle a little bigger. Well.....this ain't like caulking in a bath tub. When I put the case halves together I had way too much sealant squeeze out. I lifted the right case half off, cleaned up the mess, and will try again tomorrow. Note the rods tie wrapped so they don't flop around and the guide on the flywheel shaft that spreads the bearing rollers so the right case half will drop on and not hang up on the inner bearing race.
The only place H-D does not use a gasket is between the engine case halves. The specified H-D High-Performance Sealant, p/n 99650-02, was stiff and hard to work with. Maybe I had an old tube, but there was no date on it.
I did some research and bought a tube of Yamabond 4 which is highly recommended for sealing engine cases without gaskets. It's not suppose to harden and crack with age or make engine disassembly overly difficult.
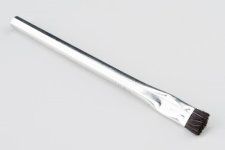
It was thin enough to spread on with a disposable acid brush with the bristles trimmed short. I just squirted some in a little cup, dipped the brush, and painted it on the right case half.
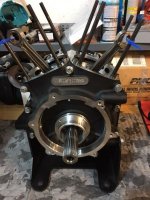
The cases are now back in the engine stand with the new flywheel assembly installed. I'll pour a cup of oil over the rod bearings into the cases after 24 hours and let it set over the weekend. Not a thorough test, but certainly any drips will be a fail.
I did a little non-engine work and took both wheels in for new Dunlop American Elite tires.
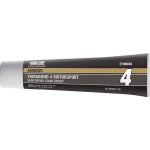
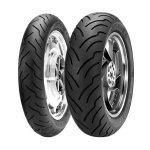


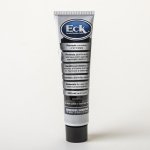
As I reassemble, when Loctite is not called for, I am putting a little Eck on the bolt threads that go into aluminum. Eck prevents galvanic corrosion between steel and aluminum. It provides some lubrication so I am torquing those bolts to the low limit in the service manual. Eck Link
I am using high strength polished stainless steel 12 point bolts from Diamond Engineering on the engine covers. Stainless steel is known to cause galvanic corrosion with aluminum. Diamond Engineering Link
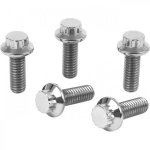
I am using high strength polished stainless steel 12 point bolts from Diamond Engineering on the engine covers. Stainless steel is known to cause galvanic corrosion with aluminum. Diamond Engineering Link


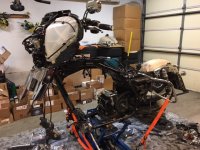
Today I took the forks off to change the fork oil. I have the Harley cartridge fork kit p/n 45500158. I think the forks work great and I hope they will be even better with high performance Amsoil synthetic fork oil in them. The bike is really looking distressed now. Time for an inspection, a little cleaning, and then reassembly. I will have the rebuilt cylinder heads back at the end of the week.

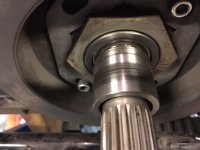
Hmmm......More worn out parts. This time its the transmission main shaft bearing inner race. You see this when you pull the inner primary housing off. That distressed looking area is bad news for a roller bearing. This bearing reacts the primary chain loads on the clutch hub.
I had to order a special tool kit to remove and install a new race. I was ignoring this thinking it was a sleeve for the inner primary shaft seal. Well it's that and a bearing race. The new chrome inner primary housing I bought came with a new bearing and seal installed from H-D. Nice.
Best I can tell, the transmission is in good shape. That is the only assembly I have not opened up or replaced. I pulled the drain plug and it had the usual gray mud on the magnet. No slivers or chips. Normal for 10,000 miles on the oil I guess. The drive belt and pulleys look a bit worn, but have more life in them for sure.
I had to order a special tool kit to remove and install a new race. I was ignoring this thinking it was a sleeve for the inner primary shaft seal. Well it's that and a bearing race. The new chrome inner primary housing I bought came with a new bearing and seal installed from H-D. Nice.

Best I can tell, the transmission is in good shape. That is the only assembly I have not opened up or replaced. I pulled the drain plug and it had the usual gray mud on the magnet. No slivers or chips. Normal for 10,000 miles on the oil I guess. The drive belt and pulleys look a bit worn, but have more life in them for sure.
hulkss, you're doing a fantastic job so far! Per your request, here are a few important tips that will make things a little easier for you.
1. Do not trust that the rings have been pre gapped, because mine weren't. I used a diamond wheeled ring grinder and only took material off of one side on each ring. This will take a little work, as you will grind, test fit rings into the jugs (using an old piston turned upside down with the top ring removed to square up the rings) and measure the gaps; repeating these steps until you get the desired gaps. Oh and don't forget to deburr the ends of the rings after you grind them.
2. Install one wrist pin clip into each piston before installing the pistons onto the rods, so that you will only have to fight with the last two clips.
3. Double check the positions of the ring gaps one last time before you fit the jugs over the pistons because they will move around a little when you're installing the last two wrist pin clips. Marking the ring positions on top of the piston with a sharpie marker before hand will help with orientation. See attached pic.
4. If you're using FM adjustable pushrods, put 4 full turns plus 5 flats on each one.
5. Disassemble lifters, drain oil, spray with brake and parts cleaner and reassemble them before you install them into the lifter bores and begin your adjustments of the pushrods. If you do this, you won't have to wait for them to bleed down during pushrod adjustments. I didn't do this on my first build, but did on the second build and will be sticking with this method from here on out.
Those are the most important things that I can think of as you move forward with this part of the build.

